

How To Install Qgis In Ubuntu 18.04
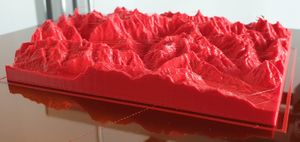
Eiger expanse in Switzerland. A chip as well much stringing
Contents
- i Introduction
- 2 Using QGIS to manipulate GIS files
- two.ane Getting and opening a DEM file
- 2.2 Interpret files
- 2.3 Merge images
- two.4 Dealing with no data values (missing data)
- two.5 Ingather/extract tiles
- 2.half dozen Polygonize raster files
- 3 Create STL from DEM files with the QGIS DEMto3D extension
- three.1 Procedure for using DEMto3D
- three.2 Post processing of the generated STL
- iii.3 Issues
- iv Installation tips
- four.1 Installation of QGIS under Windows 64bit
- 4.2 Installation of QGIS under Ubuntu 16x
- 4.three Installation of QGIS under Ubuntu 18x
- 4.4 Installation of the DEMto3D extension
- 4.5 Installation of GDAL only under Ubuntu 16x
1 Introduction
Using QGIS, the GDAL library and the QGIS DEMto3D extension is an bonny toolset for 3D printing of digital summit models. QGIS is a gratuitous GIS tool and its DEMto3D plugin allows to produce printable STL files. GDAL is a raster manipulation library available through the "Raster" menu in QGIS. It allows format translation, merging, cropping, etc.
We constitute this toolset to be both flexible and relatively easy to use. Recommended if y'all program do create peak models from a diversity of information formats. In this commodity, we describe how to use QGIS as well as command line tools to:
- merge DEM tiles obtained from SRTM (or other) data servers
- to prune tiles
- and to interpret DEM tiles to STL models
Read likewise:
- 3D press of digital top models
- Digital elevation model
Updated: Feb 2022.
QGIS is a GIS program to "Create, edit, visualise, analyse and publish geospatial information on Windows, Mac, Linux, BSD (Android coming soon)". According to Wikipedia, "Similar to other software GIS systems, QGIS allows users to create maps with many layers using different map projections. Maps can be assembled in dissimilar formats and for unlike uses. QGIS allows maps to be composed of raster or vector layers. Typical for this kind of software, the vector data is stored as either point, line, or polygon-characteristic. Different kinds of raster images are supported, and the software can georeference images."
GDAL is a "translator library for raster and vector geospatial data formats that is released under an X/MIT manner Open Source license past the Open Source Geospatial Foundation. Every bit a library, it presents a single raster abstract data model and single vector abstract data model to the calling application for all supported formats. Information technology too comes with a multifariousness of useful command line utilities for information translation and processing". Besides QGIS and the command line at that place are other options for using it, see the list.
ii Using QGIS to manipulate GIS files
Before creating a printable STL terrain model, you may have to get through a series of file transformations.
In addition, you will demand to retrieve DEM files equally explained in the master 3D press of digital elevation models article. A skilful start is using CGIAR-CSI SRTM files.
2.1 Getting and opening a DEM file
From most repositories you will have to download a "foursquare" of the Earth and so extract the part y'all want to model. Sometimes you will have to merge two squares. If y'all are not familiar with various formats and repositories, we advise getting a geoTIFF file from CGiar
- Click on 1 or more squares in the globe map and so click "Search"
- In the next page displayed you will see a selection
- Select the one you desire, download the zip file.
- In that location is no need to unpack the zip file
Now in QGIS:
- In the browser panel (to the left), browse in your directory structure until you observe the *.zip
- click on the + to open it
- Select the *.tif file

Some canary islands (tile srtm_33_7)
2.two Translate files
Sometimes you may become a file in a format that is not suitable. QGIS, i.e. the incorporated GDAL library, can read and translate several formats
In QGIS:
- Explore the raster menu
If you installed GDAL, you lot also can utilize a control line like this:
gdal_translate can translate many formats, e.g. all common raster and grid formats
gdal_translate -of output input
2.3 Merge images
Since terrain elevation data are available as squares, you may take to merge them in order to extract an area that sits "between tiles". The gdal_merge.py library tin can do that. Let's also mention that some software as well allows working with virtual rasters, i.east. tin process several tiles at the same time if they were a real moving picture. Merging images in QGIS is washed with the raster menu:
QGIS: Card Raster -> Miscellaneous -> Merge.....
- Select all the files you plan to merge
- Define the output file
- Set No data value = 0 for the output (amend than -32676, run across below)
- Make sure that "Load into Canvas when finished" is ticked.
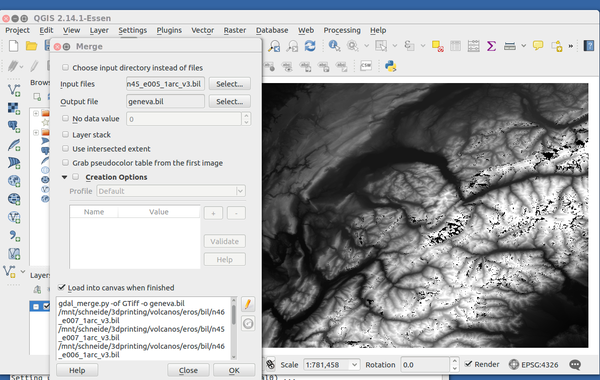
Merging *.bil tiles with QGIS
As you can see, there seem to exist some "holes" in the outcome, but that is some other trouble. If you see such holes, it can mean that you take "no information" values. In our case the number -32767 used for these turn out to be black.
- To see the nodata value of an input file, right-click on the file in the browser panel and wait at properties.
Using the command line tool (btw. QGIS will always show command lines and arguments that you use):
gdal_merge.py -of file_format -o output_file input, input, input, .....
Example:
gdal_merge.py -n -32767 -a_nodata -32767 -of GTiff -o geneva_area.bil n46_e007_1arc_v3.bil n45_e007_1arc_v3.bil n46_e006_1arc_v3.bil n45_e006_1arc_v3.bil n46_e005_1arc_v3.bil n45_e005_1arc_v3.bil
ii.four Dealing with no data values (missing data)
Missing data (called "no data") is already marked as such. They may announced equally totally black or white "holes" and you cannot and need not do anything almost these if they are very pocket-size. Larger areas though need to converted to real values if you plan to 3D print.
In QGIS, load the file into a raster layer if not already done so (encounter merging higher up).
- Menu: Layer -> Add Raster Layer
- Select a supported file format, east.thousand. *.asc or *.bil
Now you lot tin can make up one's mind which values are missing values. In the picture above (merge images), we have unmarried "band" of color: grey. Darker means lower regions, lighter ways college regions. Black is likely "freaky" data, i.e. impossibly high or low. Data points that betoken deep into the earth, i.e. Min = -32767 are "missing" data and should be ignored:
Min=-32767.000 Max=4267.000 Mean=410.805, StdDev=4753.033
- Right click on the file proper noun in the layers console
- Select properties
- See if there are "no data value". In our case, we had
-32767which is correct.
Converting missing data to another value
If your missing data represent the bottom of an model that was clipped in the z direction, e.k. you got an island but no body of water, you lot could transform the missing information values to 0. "Reclassifying" no data values is neccessary for using the Demto3D plugin, just described below.
This situation is very easy to spot before you even attempt to produce the STL:
- The background of your raster is white (while the highest points likewise look white)
- In addition, in the DEMto3D popup, y'all likewise would run into the highest point as 32767
A adept solution is therefore to transform the 32767 value (or whatever else) into the lowest value of your model, e.g. 0. To do so use the Reclassify values tool that is part of the SAGA tools (a bit difficult to observe):
Processing carte du jour -> Toolbox -> Select SAGA in the panel to the right -> Raster tools -> Reclassify values
Now, in the popup window, ringlet down and uncheck supplant other values. If you want another value than 0, you lot can alter that. The resulting new raster now should have a black background.

No value data (missing data) being translated to 0
Otherwise, e.g. if you got missing areas inside a mountain, y'all may take to use an algorithm that will interpolate values (I did not investigate how to do this yet, simple substitution will non work, unless you later can shine them out with Meshlab.).
We advise cropping a tile somewhat before using the DEMtoSTL extension. Since you also tin prune in the DEMto3D extension, you lot can prune to a larger size than needed at this signal.
Identify the area
Firstly we suggest to identify precisely or roughly the coordinates. In google, typing for case "coordinates el capitan" will requite this:
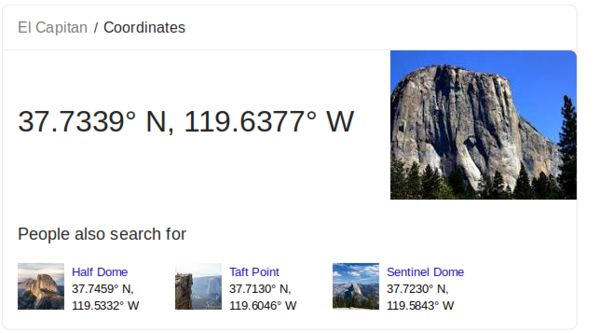
Coordinates of El Capitan
Yous so could enter the following values in the popup window. Nosotros chose to extract a 0.4 10 0.iv sized square, i.e. roughly a 44km by 44km area. One degree is about 111km (if we are correct!) and here we got 0.4.
-119.eight,-119.4,37.5,37.ix [EPSG:4326]
- xmin = -119.8 (longitude W, left, more w)
- xmax = -119.4 (longitude West, right, less due west)
- ymin = 37.5 (lattitude N, bottom, closer to equator !)
- ymax = 37.9 (lattitude N, top, closer to north pole)
Afterward, in the Demto3D tool we can clip smaller areas, eastward.g. -119.7, -119.55, 37.65, 37.8
Clipping with QGIS
In the QGIS GUI, you lot tin crop (extract an square area) from a tile.
- In QGIS V.2x: Menu Raster -> Extraction -> Clipper
- QGIS V.3.4: Menu Raster -> Extraction -> Clip Raster by Extent
Procedure:
- In the Popup window, click on the button to the right of Clipping extent and either select "Select extent on Canvas" or enter some values, e.g. something like the values above. You as well can combine the two methods. First select with the mouse, then fix values. Brand certain to understand in which direction the coordinates go...
Make sure to get the order right if y'all enter your own values and do not forget the "-" if you are in the western or southern hemisphere. To get a feel for right type of coordinates, y'all tin manually select some surface area, then modify. It usually takes 4-5 trials to become the right extent. If you select with the mouse, zoom into the area and arrive as big as you can, the select the rectangle
- Printing OK
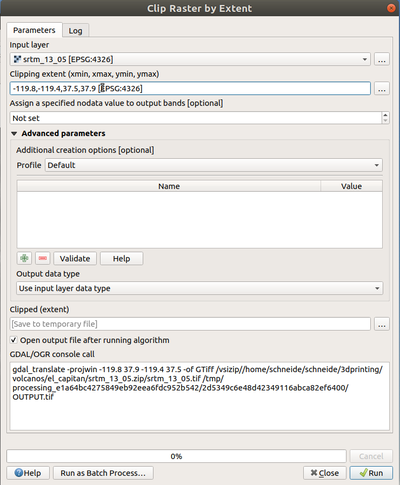
QGIS popup clip raster by extent, typing values for an el capitan square
Saving a clipped surface area (non mandatory)
- Right-click on the new created layer (lesser left panel)
consign -> save as
- Define the name of an output file. Brand sure that the file path is correct (past default the program attempts to save in a incorrect identify). File extension will define the output blazon. By default the "tif" format is used.
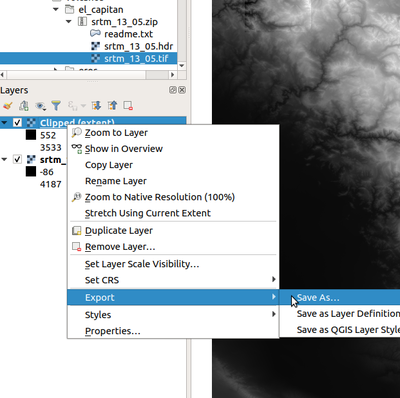
QGIS Save clipped layer to file (optional)
Alternatively, use the command line: Using the command line tool you lot could provide coordinates, east.g.
gdal_translate -projwin 5.68197537628 46.6941320621 vii.28048142324 45.6929800494 geneva_region.bil geneva_small.bil
two.6 Polygonize raster files
In default installations, QGIS and GDAL cannot directly produce usable 3D formats for press. Withal, one can produce some polygone formats that i could further translate to STL. We exercise non propose using this characteristic, since we institute the resulting files adequately unusable. See the next item.
3 Create STL from DEM files with the QGIS DEMto3D extension
Prerequisites
- DEMto3D must exist installed, see the instructions at the terminate of this article.
- Yous must have a DEM file, see the instructions at the start of this article.

DEMto3D plugin with missing height base
3.1 Procedure for using DEMto3D

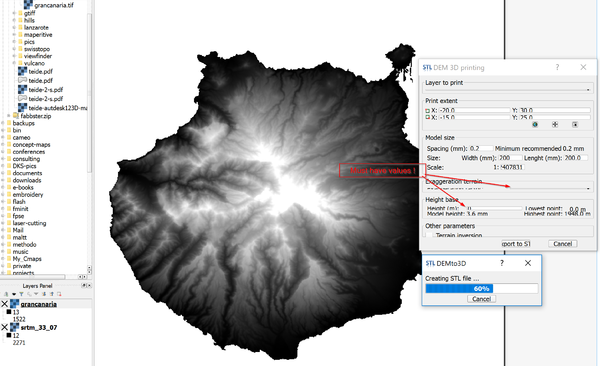
Tif to STL for Gran Canaria, correctly clipped (DEMto3D brandish problem on a 4K screen)
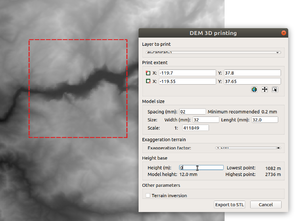
DEMto3D plugin. Clipping El Capitan expanse from a larger square
The plugin is bachelor in the Raster menu (once installed):
- If yous already clipped the tile, so select full extent (click on the picayune globe), else requite coordinates
- Now make sure to untick all other models from the layers panel, nosotros also suggest killing the ones that you won't need. On the screen you lot but should see a unmarried layer. Make certain that the red dotted lines surround the object. Else, shut QGIS and just load this file.
- Ascertain impress extent offset, else there volition be error messages !!
- Define width or length, eastward.g. 150mm (15cm) for a skillful build plate or 32mm for a 4x4 lego block. Alternatively y'all could enter the scale and so decide how large yous can/want print and adapt the width at present.
- Define spacing (we propose 0.25 or 0.iii mm for larger models)
- Exaggeration factor: 2.0 (or less or more) for large models and 1.5 for smaller models
- Model height: Enter the lowest point in meters, i.e. 0 in most cases. If you model the K2, you could beginning at 3500 meters though. Entering a negative number will have the plugin crash.
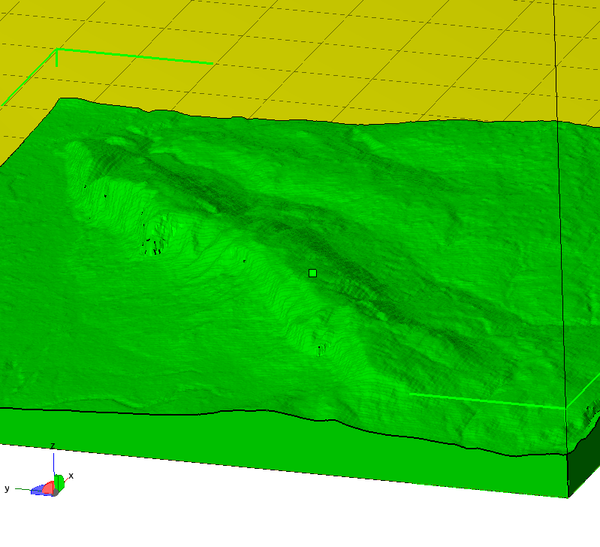
We tested this plugin with several data sources and several file sizes. Information technology can produce large and detailed STL files.
Exporting a larger mode will take a few minutes and much more on a slow computer. Resulting STL files can have twice this size. We extracted Gran Canaria from a CGiar tile (srtm_33_7) that included besides Tenerifa and other "middle" islands. The tif was 625KB (rather minor) and the resulting STL was 775 MB, i.east. very large. I used both Meshlab and Meshmixer to reduce the triangles as explained in the main commodity.
Beneath is the area around Geneva made from 30m SRTM information. The raw result as seen in Meshlab is rather pretty. Of course, it may exist pointless to create a model of such a big area with 30m data. Creating model of small areas with more precise data, nevertheless, is an option one must consider.

DEMto3D plugin. View of the Montblanc from somwhere over the Jura. Geneva is to the right and Lac d'Annecy top correct
Below is a screenshot of the almost prepare-to-impress 10x10 cm model of the Salève, the Geneva house mountain. Information technology was done with the following parameters:
- Full extent (I clipped the area before)
- Size width = 100
- Everyman signal = 100
- Exageration factor =one
I did not make any changes to the output file. Of course it would be wise to practise a preventive Meshrepair. In one case too could consider augmenting the exaggeration factor to 1.ii or i.five maybe.
DEMto3D plugin. View of the Salève (Netfabb). As y'all can see model fits on the platform as expected and is well positioned.
DEMto3D plugin. View of the Salève (Meshlab)
iii.ii Post processing of the generated STL
The STL output is ascii (not binary), i.e. it could be compressed quite a lot to binary STL. If you started with depression resolution data, yous have too many triangles which is a not problem per se, just can drastically augment slicing time. Also y'all cannot e-mail 500MB to 1TB files even if you lot compress these to 50 to 100MB files . Therefore, read in the overview commodity how to reduce meshes with the gratuitous Meshlab plan. Alternatively, use another tool, e.thou. Meshmixer or Microsoft 3D builder. In improver, I recommend repairing the resulting file with a tool similar Netfabb.
Likewise, I do have the feeling that some DEM models should be emptied with a tool like Meshmixer, using its "brand solid" functions. I had more than one print abort because the second hot end got stuck because too much plastic got deposited in models that were not optimally sliced. Just I did not have time to look into the problem, i.e. analyse thou-code and exam different slicers. In any case, volano press is much harder than printing nice elegant Voronoi structures.
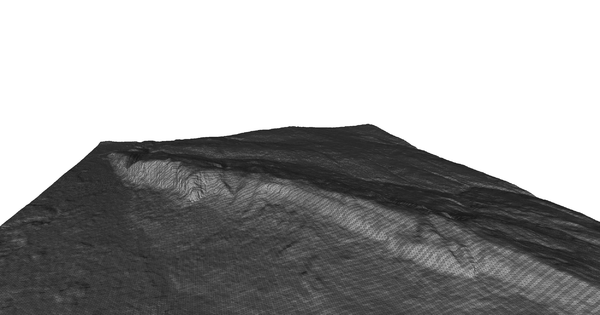
For starters, I printed 2 models of the famous Vulcano island using both 2m and 15m resolution *.tif files. Before press I did reduce a large STL file (made from 2m data) using Meshlab. Before reduction the ascii STL file size was 590MB, the reduced binary STL was 16MB, i.due east. more manageable. After reducing I had to fix the STL in Netfabb and information technology was proficient for press. I also printed a model of just the volcano fabricated from 15m data and in addition made some small-scale custom Legos to distribute to the children of the island. Later on, I also produced smaller models of Geneva area, Canari islands (e.m. Gran Canaria) and the Vercors area in France.
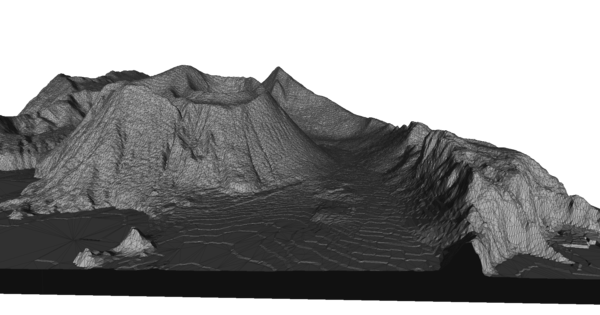
DEMto3D plugin. View of Vulcano island (2m data) with a 0.one reduced mesh (Meshlab)
I do recommend this tool chain, if yous work with high resolution tiles and/or if yous have data that need some processing (e.g. tiles that need to be assembled and clipped, or no data value files)..
iii.three Issues
(as of March 2022)
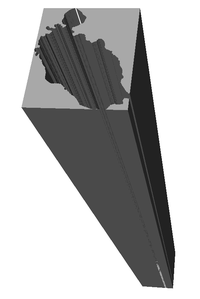
Missing data
- If your STL model is deeply hidden at the bottom of a huge tunnel block then you take a no data problem. E.k. if you lot take a fiddling island and the body of water effectually the island has no data coded with "32767" and then the isle will sit at the bottom of a 32km loftier tunnel. See to a higher place how to deal with no information values. IMHO this plugin should not compute "no data values", but it does :)
Messed up display with high resolution screens
An older version of this plugin did not adjust to high resolution screens under Windows (QGIS 2.18.iv to 2.18.14). This has been fixed in summer 2022, therefore upgrade'. If you still must use an one-time version or nevertheless got problem in your configuration:
- Workaround 1: apply the TAB to move frontward and type blindly. Look at the screenshot above. Yous probably even so can fill in "model size" paramters. It is important to make full in at least the "width", eastward.m. 150 (mm). Yous will accept to fill in Exaggeration gene (blazon something similar "2.0" and hit TAB, then type due east.chiliad. "0" for the lowest point.
- Workaround 2: Adjust screen resolution to a depression one (e.yard. Hard disk drive) and reduce font size to 100% (typically you would use between 150% and 250% on a high resolution screen and this is the trouble). This will require login out and back in.
- Workaround iii (my preferred solution for Windows):
- Read in the Inkscape article how to lower DPI Scaling for just some applications.
- In short, right click on QGIS shortcut in the file director, and select
Properties - Select Compatibility TAB and click on
Change high DPI settings. Then, play with the settings. I ticked both boxes and selected Organization (enhanced.
DEMto3D problem on a 4K screen
The author of the plugin tin can probably non run across this. Since it took Adobe several years to figure that people really do utilise screens with lots of pixels, nosotros won't complain hither.
Crash nether Ubuntu
- The application may crash nether Ubuntu 16/QGIS 2.xiv.one. Workaround: Use Windows (or mayhap install a newer version by hand). Too, avoid using network drives.
Empty STL
- If you lot use a Network bulldoze (hapened both on Ubuntu and Windows), endeavour saving locally. A file with 347053 MB merely worked that way.
iv Installation tips
4.1 Installation of QGIS nether Windows 64bit
Accept the latest 64 bit version installer from here.
The program is rather large: download is 395MB and installation is one.6GB.
4.2 Installation of QGIS under Ubuntu 16x
To install the huge QGIS Geographic Information Systems Package, you may need to configure a GIS repository
sudo apt-go install python-software-backdrop sudo add-apt-repository ppa:ubuntugis/ppa sudo apt-get update
Now you lot can select dozens of packages described in Packages in "ubuntugis-stable". To install QGIS:
sudo apt-become install qgis
4.three Installation of QGIS under Ubuntu 18x
The required "Palma" version is included in the standard distribution
sudo apt install qgis
If you want a ameliorate version, i.e. QGIS 3.four.x Madeira LTR
- edit /etc/apt/sources.list and add:
deb https://qgis.org/debian-ltr bionic main
- Add the signature
- Add a key. do something like this (please, search for data, I forgot)
wget -O - https://qgis.org/downloads/qgis-2017.gpg.key | gpg --import gpg --fingerprint CAEB3DC3BDF7FB45 gpg --export --armor CAEB3DC3BDF7FB45 | sudo apt-central add -
- update
sudo apt update
sudo apt install qgis
iv.4 Installation of the DEMto3D extension
To produce directly STL from raster files, install the DEMto3D plugin. From the plugin installation dialog: DEMto3D is the starting time tool that links GIS (Geographic Data Organization) and 3D printing. DEMto3D allows consign DEM to STL format set up to 3D printing. [..] Author: Francisco Javier Venceslá Simón
As of April 2022, this plugin only worked with QGIS 2x "Palma" (which is the official stable long term version). As of Jan 2022, DEMto3D version 3.1 works with QGIS 3.x
Installation steps:
- Menu Plugins
- In the popup, select
Not installedin the left panel - Select DEMto3D
Alternative installation steps you tin can try if the above does not work, e.g. for QGIS 3x on April 2022
- Become the zip file: https://plugins.qgis.org/plugins/DEMto3D/
- Menu Plugins
- Install from Nothing
Problem
As of July 2022, this plugin did not work with the about recent QGIS version. E.g. on April 5 2022 we got:
Couldn't load plugin 'DEMto3D' due to an mistake when calling its classFactory() method ModuleNotFoundError: No module named 'PyQt4'
The easiest solution was to install the older stable "Palma" QGIS version. That is what I did :)
As of January 2022 DEMto3D works just fine with QGIS 3.four.5 Madeira (tested with windows 10 and Ubuntu xviii). There is even so a display trouble though...
4.v Installation of GDAL only nether Ubuntu 16x
We rather recommend installing but QGIS as describe to a higher place, only the following is more practical for people who merely need a few command line options for manipulating terrain data files.
To install a consummate GDAL package, follow these instructions as summarized below:
Requirements, some python extension and the GIS PPA
- See above for GIS PPA
The following volition install GDAL, including Python bindings
sudo apt-go install gdal-bin sudo apt-go install libgdal-dev sudo apt-become install python-gdal sudo easy_install gdal
Examination if something works. Get a DEM file and see if you tin extract data. Examples, using files I extracted from diverse athenaeum. Each should work and provide near xx-30 lines of information (file content, coordinates, etc.)
gdalinfo n45_e006_1arc_v3.bil gdalinfo n46_e006_1arc_v3.tif gdalinfo srtm_38_03.asc

Source: https://edutechwiki.unige.ch/en/3D_printing_of_digital_elevation_models_with_QGIS
Posted by: goldbergexpromen.blogspot.com
0 Response to "How To Install Qgis In Ubuntu 18.04"
Post a Comment